Whether you’re hanging a picture or building a house, concrete anchors are a necessary tool whenever you’re working with concrete. Concrete anchors come in many varieties, shapes, and sizes, and you can use them for fixing virtually anything to concrete surfaces.
Concrete anchors are bolts, nuts, and sleeves that securely join concrete to wood, stone, metal, plastic, concrete, and more. The threaded anchors are inserted into the concrete, allowing you to bolt anything down to the surface.
In this article, we’ll go over the many uses for concrete anchors and help you decide what kind may be best for your projects. We’ll also discuss the different types of concrete anchors in detail, guiding you through how to install them on your own. No matter what you want to secure to your concrete, we have you covered.
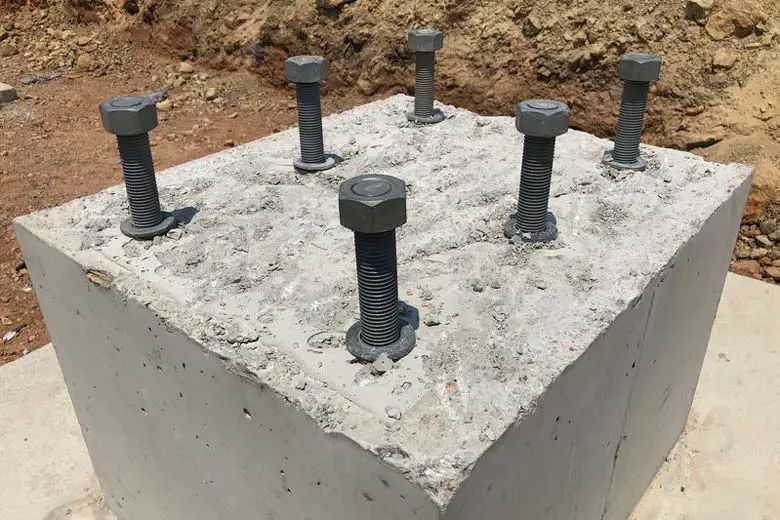
Table of Contents
What Do Concrete Anchors Do?
Concrete anchors are bolts, sleeves, and nuts that join concrete to different objects such as other concrete slabs, wood, metal, foundations, floors, walls, machinery, and so much more.
Anchors are usually used when installing pre-poured concrete into a structure to join concrete floors and walls to foundations and other structural materials.
Concrete anchors have endless applications. You can use light-duty concrete anchors to secure wall hangings, towel bars, facades, wood flooring, doors, and other objects under 50 lbs (22.7 kg) to concrete surfaces.
Medium-duty concrete anchors can hold weights of up to 200 lbs (90.7 kg), useful for installing light fixtures, pull-bars, railings, and house siding.
Heavy-duty concrete anchors are made chiefly for construction, and they hold weights of over 200 lbs (90.7 kg). You can use heavy-duty concrete anchors to join concrete slabs, secure concrete to cinder blocks and metal beams, and install concrete flooring.
They’re common when building foundations and putting houses together, as well, so heavy-duty concrete anchors are an excellent way to make your concrete structures strong.
What Kind of Concrete Anchor Do I Need?
There are many different types of concrete anchors, each with its own unique applications. Some concrete anchors bear more weight than others, and some are embedded deeper into the concrete surface.
You’ll need to choose the proper anchors for your project so that your concrete stays intact and so that the objects you’re joining to your concrete are securely fastened down, no matter how much weight you put on them.
Keep reading to get a better understanding of which type of anchor that fits your needs.
Concrete Anchor Types
Cast-in-Place Anchors
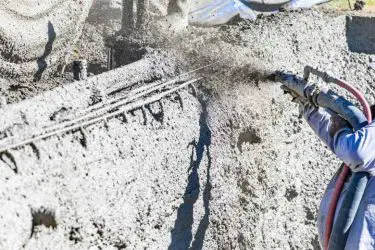
Cast-in-place anchors are installed into wet concrete, which permanently fixes them into the concrete’s surface. These anchors are durable and can bear hefty loads.
Since they’re so strong, they’re excellent for securing heavy objects to concrete surfaces, fixing concrete slabs to each other, and joining concrete slabs to structural materials such as beams, walls, and foundations.
Post-Installed Anchors
Post-installed anchors aren’t as secure as cast-in place-anchors, but you can still use them to add anchors to concrete.
Even if they’re less secure, a heavy-duty post-installed anchor can bear loads of more than 200 lbs (90.7 kg), which means they’re still highly durable.
Post-installed anchors are excellent for securing facades, floors, and large objects to concrete surfaces. They’re also used to attach machinery, countertops, fireplaces, floorboards, and more to concrete slabs.
Concrete Anchor Size
All concrete anchors come in various diameters and lengths. Longer and thicker concrete anchors are better for bearing heavy weights, such as walls, steel beams, structural materials, and heavy machinery.
Smaller anchors are more for attaching smaller or lighter objects — such as counters, floorboards, large furniture, mantelpieces, and facades — to concrete slabs.
Concrete Anchor Metal
Another factor to consider when picking out the best concrete anchor for your project is the metal that the anchor’s made out of.
Most concrete anchors are either made of stainless steel or zinc.
For the most part, steel is better for outdoor or wet environments, and zinc-plated anchors are ideal for indoor or dry environments.
Cast-in-Place Concrete Anchors
Cast-in-place anchors are some of the strongest, most secure anchors available.
As the name suggests, cast-in-place anchors are inserted into the concrete before curing, which permanently embeds the anchor into the concrete slab.
These anchors are often used to attach walls to concrete foundations, secure heavy machinery to concrete floors, add cumbersome facades to concrete, and fix pre-poured concrete slabs.
Cast-in-place anchors also bear quite a bit of pressure without cracking the concrete. When using concrete anchors, there is little risk of the concrete crumbling or cracking around the anchor.
Since they can protect your concrete’s integrity, they’re one of the most efficient securing options if you’ll be placing a lot of weight on the concrete surface.
Lifting Inserts
Lifting inserts are used to attach lifting mechanisms to concrete, making it easier to move and transport concrete slabs.
Lifting inserts usually consist of a small metal pin attached to a round eyelet that you cast into the concrete.
You can use these eyelets to attach the concrete slab to heavy-lifting machinery, and they can function as grips for moving smaller concrete structures by hand.
Anchor Channels
Anchor channels are metal brackets that function a bit like a track for your bolts.
They’re rolled steel channels installed into wet concrete, and they allow you to remove and add new bolts to the channel.
They’re also flush with the concrete slab’s surface, preventing tripping hazards when not in use. Anchor channels are versatile since you can shift the bolts or remove them as you wish.
Headed Studs
Headed studs are used primarily for welding metal onto concrete. They’re called headed studs because they have thick steel heads that stick up from the concrete.
A welder can use these steel heads to secure metal sheets or beams to the surface, allowing you to attach steel, aluminum, tin, and other metal types to a concrete slab.
Threaded Sleeves
Threaded sleeves can also be precast into concrete, and they allow you to use bolts to attach objects to the concrete surface.
They’re simply threaded metal sleeves placed into the surface of wet concrete and allow you to use a bolt to secure anything down to the surface.
These sleeves are excellent for securing multiple concrete slabs to each other, securing removable machinery and structures to concrete floors, and installing floorboards.
When not in use, the threaded sleeve is flush with the concrete surface, keeping the anchor from sticking up from the concrete, causing a potential tripping hazard.
Post-Installed Concrete Anchors
Post-installed concrete anchors are installed into pre-cured concrete using a drill.
If you find that you need a concrete anchor after the concrete has already cured and hardened, post-installed concrete anchors are the only option for you.
They’re a bit less durable than cast-in-place concrete anchors, but they’re still solid options.
Post-installed concrete anchors are secured within concrete using a drilled hole. They’re usually only used for superficial — as compared to structural — applications, but you can use them to secure wood, facades, siding, countertops, and much more to concrete slabs.
Lag Shield Anchor
Lag shield anchors have many different applications. They have a lag screw and a lag shield, a threaded sleeve that you install into the concrete.

Lag shield anchors are one of the most popular post-installed concrete anchors since the shield is hammered down into the concrete, leaving a smooth surface on the slab.
They’re also highly secure. Lag shields are designed to split open and expand when you thread the screw into the shield.
When you insert a lag screw into the shield, the shield’s bottom splits in half, increasing its diameter and securing it into the concrete with its metal ribbing.
Because of its ability to expand, this concrete anchor can hold heavy weights, and it can withstand plenty of pressure.
Wedge Anchor
Wedge anchors are easy to install, and they’re very secure. Wedge anchors look like a standard bolt with a fluted end and a small metal shield on them.

When installing a wedge anchor into concrete, you can use a mallet to force the anchor’s fluted end into the surface. After using the mallet, you will then use a nut to secure something down to the concrete.
When you tighten the nut on a wedge anchor, the anchor’s fluted end rises, forcing the small metal shield on the bolt to expand.
When you have installed and tightened the anchor, you cannot remove it, but you can use a mallet to hammer it deeper into the surface.
Since this anchor is practically non-removable, it’s incredibly durable, and it’s the best post-installed option for fixing heavy objects and materials to a concrete slab.
Drop-In Anchor
Drop-in anchors consist of a bolt and a sleeve. The sleeve’s top half is smooth, while the bottom half is bumpy and knurled with small slits.

This rough slitted portion allows the sleeve to expand after you drop it into the concrete, which will keep the bolt secure.
Within the sleeve, there’s a pin that you can drive into the concrete after dropping it into your drilled concrete. The pin keeps the sleeve fixed within the concrete surface.
To release the pin from the sleeve, you’ll need to use a setting tool when installing a drop-in anchor.
The setting tool is a metal rod that you insert into the sleeve after dropping the sleeve into the concrete.
Once you insert the setting tool, you’ll strike it with a mallet to release the pin and drive it into the concrete.
Sleeve Anchor
A sleeve anchor is essentially a hybrid of a wedge anchor and a lag shield anchor. Sleeve anchors have a long metal sleeve and a bolt with a fluted or wedged end.

The sleeve has some slits and cross-cuts in it, which allows the sleeve to expand once you tighten the bolt.
To install a sleeve anchor, leave the sleeve, nut, and washer on the bolt and hammer the anchor into the concrete with the wedge on the bottom, leaving enough of the anchor exposed to secure the object that you’re going to affix to your concrete.
When you tighten the nut, the sleeve will expand, securing the anchor into place permanently.
Sleeve anchors are a popular option for installing lighting fixtures, doors, deck joists, and securing electrical boxes to concrete.
Depending on whether you get a heavy-duty or light-duty sleeve anchor, the opportunities are endless.
Hammer Drive Pin Anchor
Hammer drive pin anchors are permanent, and you cannot remove them after installation.

They’re usually best for applying wood to concrete since they’re shorter than other anchors, and they don’t have threads, so you can’t remove the object that you’re fixing to the concrete after installing the anchors.
Hammer drive pin anchors have a sleeve attached to a longer pin. The sleeve has a slotted end that expands when you drive the pin into the concrete.
To install one of these anchors, drill your hole and then use a mallet to drive the pin deeper into the hole.
Once you’ve hammered the pin enough, permanently affix it to the concrete.
Always use these anchors directly on the materials that you’re trying to secure to the surface when installing them.
How To Install a Post-Installed Concrete Anchor
Installing a concrete anchor shouldn’t take more than 15 minutes. Knowing how to install your own concrete anchors correctly can help you complete any concrete-related project that you can imagine, whenever it’s convenient for you!
Before installation, make sure you have the most suitable anchor for your project.
As a general rule, shorter anchors work better on softer materials, and longer anchors are better for denser, more rigid materials like concrete.
However, if you’re attaching wood or plastic to your concrete surface, you may want to use a shorter anchor.
Consider the thickness of the object you’re trying to attach to the concrete when deciding how long your anchor should be.
Generally, if you add the desired embedment length, the thickness of the material you’re fixing to the concrete, and the nut and washer’s thickness, you can figure out how long your anchor should be.
Grab a Mallet, Anchor, Hammer Drill, & Wrench
Before installing your anchors, you will need a few tools:
- A mallet
- A concrete anchor
- A hammer drill with a correctly sized masonry bit
- Open-end wrench
- Vacuum, compressed air, or brush to clean the hole
- Setting tool (for drop-in anchors)
Installing a Concrete Anchor Step-by-Step
Once you have all of your tools and are ready to install your anchor, it’s time to get drilling.
To install your anchor:
- Find the right sized drill bit for your anchor. Before starting, investigate the length and diameter of your bolt. Your concrete anchor will usually have a marking on it that indicates what width your drill bit should have.
- Mark your drill bit with the anchor’s length. After finding the right masonry bit, hold it up next to your anchor and use a marker to mark the bit with the anchor’s length. If you mark your bit, it’ll be easier to ensure that you drill the concrete correctly. Next, attach your bit to your hammer drill.
- Drill a hole ½-1 inch deeper than the anchors length. Clear your concrete surface and start to drill your hole. You should drill the hole between ½ inch (1.3 cm) and 1 inch (2.5 cm) deeper than the anchor’s total length.
- Clean the hole using a vacuum or compressed air. Once you’ve drilled your hole, remove the bit and use a vacuum, compressed air, or a small brush to clean out all of the dust. It’s essential to clean out the hole as well as you possibly can since too much dust may affect your anchor’s strength.
- Put the anchor or sleeve into the hole. Once the hole is clean, put your anchor into your drilled hole. If you’re using a lag shield, drop-in anchor, or sleeve anchor, insert the sleeve into the hole. Use a mallet to hammer the anchor or sleeve into the hole, ensuring that it’s secure. To test it, try to pull the anchor out of the hole.
- Use the required setting tool (for drop-in anchors). If you’re not using a drop-in anchor, skip this step. Insert the setting tool into your drop-in anchor and use your mallet to release the pin from the threaded sleeve. Hammer until the sound of your hammering changes from a sharp ringing sound to a lower, deeper sound.
- Thread your anchor and test its strength. To ensure that you have installed the anchor properly, thread the screw, bolt, or nut onto your concrete anchor. Pull the anchor to test its strength. If you installed it correctly, it should not budge.
- Attach whatever you need to fasten to the concrete. Once your anchor is secure, you can use it to attach anything you want to your concrete.
Summary
Concrete anchors are the best way to add new features to concrete. You can use them for many purposes, from constructing structures to hanging pictures on concrete walls.
Some concrete anchors are inserted into wet concrete, making them more durable, but you can add anchors to pre-cured concrete, too.
Installing concrete anchors is a simple task that only takes about 15 minutes, so nothing is holding you back from making your concrete work for you.