A retaining wall’s job is to hold soil behind it – to specify, they’re built to keep soil from being washed away when it rains. You can think of retaining walls as dams to hold back dirt instead of water.
Retaining walls are excellent to add some aesthetic appeal to a yard (park or building) and can serve as a privacy screen. Retaining walls can also increase the value of a home, so they’re an excellent long-term investment for homeowners.
While retaining walls can be built out of many different materials, we will focus on the concrete version.
To build a concrete retaining wall, you’ll need to know their uses and whether or not you need an engineer’s and a permit for construction. There are multiple steps required to complete this building project, and a few things you shouldn’t do, like neglecting maintenance or making the job too big.
Building a retaining wall – in this instance – is more complicated than merely laying concrete bricks; in this article, you’ll learn:
- What steps need to be taken before building a retaining wall (if you’ll need an engineer’s help and a permit to construct the wall)
- How to go about constructing your concrete retaining wall
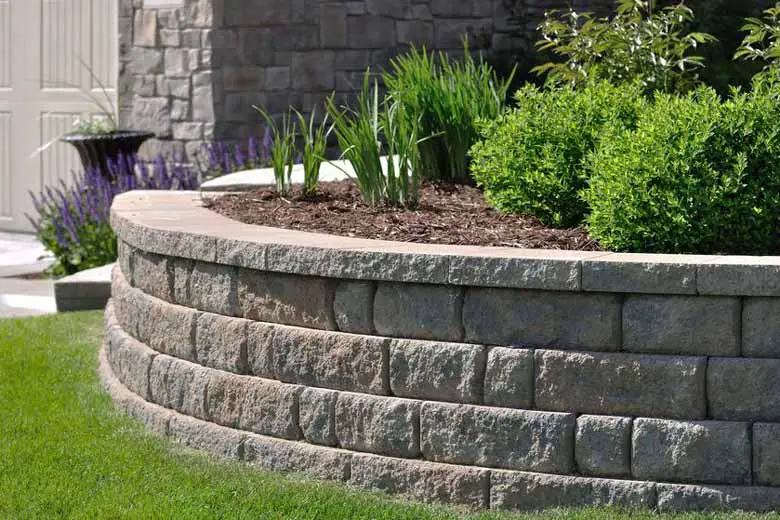
Table of Contents
Things You May Need (To Do) Before Building the Wall
Building a retaining wall (or anything, really) on your property is a bit more complicated than completing the project. You may not be able to merely put up your structure and get on with your day.
Some building projects require engineering plans and permits to ensure that they are being built legally and up to code.
An Engineer’s Assistance To Build Your Wall
It might not be possible to build your retaining wall (entirely) on your own. Depending on the wall’s design or purpose, you’ll probably need the advice of a licensed engineer.
An improperly built retaining wall can fail catastrophically and cause a lot of damage. You shouldn’t risk the build going wrong if you’re unsure you have the ability to complete the job on your own.
Your wall might not be completely DIY, but it’s in your best interest to get in touch with a professional so your wall is structurally sound.
There are three significant reasons why you’d want to speak to an engineer before building your wall:
- You’re going to park vehicles on top (meaning on top of the land behind the wall) of your retaining wall
- You want to build a terraced retaining wall
- The top of the wall has a slope
Additional weight on top of a retaining wall is called a surcharge, which, in this case, would be any vehicles you intend to park on top of your wall.
Having large amounts of weight on top of a retaining wall can cause it to lean, which might eventually lead to it collapsing. A qualified expert can help you plan the construction of your wall to avoid this.
Terraced walls are more complicated to build and plan appropriately. Typically, if the front wall is a certain height, the back wall has to be twice that height away from the front wall. For example, a 4-foot front wall would have the rear wall built 8-feet directly behind it. The front wall also has to be taller than the rear one.
Slopes also count as surcharges, and although the height of a slope requiring the assistance of an engineer varies from state to state differ, you should call one anyway.
A licensed professional can adequately evaluate the incline and tell you if they’ll need to assist you in drawing up a design.
Also Read: Do You Need a Concrete Footing for a Retaining Wall?
A Building Permit To Build a Retaining Wall
Retaining walls located next to roads and paths taller than 4-feet will require a permit. You’ll also need a building permit for a wall that’s taller than 7-feet that’s being placed anywhere else on your property.
Walls next to sidewalks and decking may need safety rails, so you should contact your local building code department for this also.
For those of you unsure how to get the correct measurements for your wall, you’d do so by measuring from the bottom of a ground brick to the top of one of the uppermost bricks. You can call someone out to your home to take the measurements for you if you are still unsure or would prefer a professional to do it for you.
The retaining wall instructions we’re providing are geared toward DIY enthusiasts; true, it doesn’t hurt to have the information mentioned above.
After you’ve contacted your local officials and looked into whatever permits you’ll need, you can expect to spend a few days building the wall. That said, it’s better if you pick 2-3 days where you have nothing else to do to construct the wall.
You’re also going to need the proper PPE; things like goggles, masks, and gloves are a must.
Tools You Will Need
- Straight edge
- Circular saw
- Rubber mallet
- Trowel
- level
- Hammer
- Block chisel
- Tape measure
- Tamper
- Shovel
- Construction adhesive
- Stakes
- String
Materials Required
- Sand
- Compactable gravel
- Pea gravel
- Perforated corrugated pipe (optional)
- Concrete blocks
Concrete blocks can be quite pricey, and you’ll probably end up shopping around to find some that suit your price range and personal aesthetic preferences.
Specialty landscaping stores, in particular, tend to charge on the more expensive side, but they’re the better choice if you need materials delivered.
Speaking of delivery, if for some reason you can’t have the building supplies brought to you by the store, you’re going to need a heavy-duty truck. It may not seem like it at first, but large amounts of sand, gravel, and concrete blocks can be weighty.
How to Build a Concrete Retaining Wall Using Concrete Blocks
If you prefer watching a video over reading the instructions we embedded a great video further down this article, after the step-by-step guide.
1. Prepare the Site
Contacting the local authorities, utility, cable, and telephone companies before building your wall is a must. The project will involve digging, and it’s best that you check if a permit is needed to excavate your yard. You’ll also need pipes and cables marked off so that you don’t accidentally damage anything.
Once you’ve figured out where everything you don’t need to dig into is – and gotten any necessary permits – you’ll need to plan out the wall properly.
This step is where you should decide and clarify where you’ll put it and the wall’s width and length with your tape measure. The stakes and string are for you to mark off the wall’s measured dimensions in the ground.
2. Dig the Trench and Level the Ground
To begin building the wall, take your shovel and dig a trench that’s about 4 to 6-inches deep and twice as wide as one of the concrete blocks. The ditch is as deep as it is, so about half the first layer of bricks are submerged into it.
For your wall to be structurally sound, it needs to be stable. To be sure that you’ve dug a level trench, you’d use your tamper to flatten it properly. Afterward, use your level to make sure that the bottom is even.
3. Lay the Base Layer
Now that the trench has been dug and flattened, you can add the gravel and sand.
The tamper will be your best friend for this step as it can help you smooth down the 2 to 3-inch layer of compactable gravel.
Use your level to make sure you’ve evenly layered the gravel onto the bottom of the trench.*
The trench now needs a thin layer (½ to 1-inch) of sand spread over the gravel. Spread the sand, smooth it over with the tamper, and check how evenly set the sand layer is with your level.
It’s vital you use compactable gravel for this, as it needs to be packed tightly into the trench for stability.
* If the gravel and dirt isn’t perfectly layered during this step, you still have the opportunity to do so during the next step
4. Lay the First Brick Layer
Your ditch is dug, leveled, and layered with gravel and sand. Here’s where you’ll lay your first set of bricks.
To begin, place your first brick into the middle of the trench and use a standard level to check that it’s laying evenly. If it isn’t, take the rubber mallet and tap it into the ground.
Once your first brick is applied, continue laying bricks while checking how even each one is. You may have to either tap some into the ground or add a bit more sand to even things out.
When all the bricks are set, add some gravel in the area between the retaining wall and your yard and tamp it down.
5. Cut Your End Bricks
Staggering your bricks will make your retaining wall strong and stable. You’d cut the end brick of each even-numbered layer half to stagger your wall. The fourth and sixth layers would have halved bricks while the fifth, third, and first layers would have whole end bricks.
There are two ways to cut the blocks in half:
- Draw a guideline with a straight edge and cut the bricks with a circular saw
- Use the V-shaped notch that some blocks have on the underside as a catch to hammer and chisel them into two
6. Lay the Other Layers
You can lay the second layer atop the first one you’ve previously set now.*
Usually, a retaining wall made of bricks won’t need caulk or another adhesive, so you can stack them on top of each other.
Take care to remove any dust or bits of trash that’s found its way onto the first row of blocks and begin the second layer with one of the halved bricks. The end of the row should end with another half-block.
Before moving on, check that the bricks are level and lay the third layer (start with a whole brick) and continue until done. Take your level and check if the layer is even before laying bricks until you’ve built up the wall.
*A drain pipe can be added behind the retaining wall after laying the second layer. Installing the drainpipe is easier to do with only two layers installed. See installation instructions in the next step
7. You Can Add a Drain Pipe (optional)
You can install a drainpipe if you feel the need to do so. Cover the piping with a Drain-Sleeve to prevent clogging before the pipe is installed, as it’ll be difficult to remove later.
Place the perforated corrugated drain pipe behind the wall – it should be long enough to run the length of it so that it drains out away from it – then place gravel on top of the drain to bury it.
8. Fill the Back of the Wall
Backfilling the wall is the penultimate step you’ve got to complete before the retaining wall is done. The wall-filling can either be pea gravel or sand.
If you use sand, cover the retaining wall’s back with landscape fabric to keep it from getting between the bricks. If you use gravel, you can pour after every layer to allow it to settle.
Take the time to slowly backfill the retaining wall so you can tamp and smooth it to make sure there are no empty pockets.
Once you’ve backfilled to just under the top of the wall, you can add soil for your plants.
9. Add the Capstones
The final step is adding the capstones. Before adding the capstones, brush off any dirt and debris on the final layer of blocks and be sure they’re dry.
Adhesive glue won’t stick to wet bricks. You would add construction adhesive atop the last layer of bricks and place your capstones onto them, ensuring they overhang by 1 to 1 ½ inch.
Here’s a video explaining and showing every step of building a retaining wall with concrete blocks:
What Not To Do When Building a Concrete Retaining Wall
As the given instructions may indicate, it’s possible to build a retaining wall on your own; it’s not an easy project to do.
There are two things in particular that are huge mistakes when building DIY retaining walls (and DIY projects in general).
Making the Job Too Big
An essential part of doing any DIY work is knowing what your limitations are. It’s not uncommon for a weekend warrior to take on more than they’re realistically capable of.
That doesn’t mean that they can’t complete a relatively tricky job with adequate instruction, however, just that it might be something best left to a professional.
A general rule of thumb is that if you don’t have the skill set needed for a specific DIY job around your home, you probably shouldn’t do it. Often, if a DIYer makes a mistake, it’s costly, and they have to call a professional to fix it.
Neglecting Maintenance
It would be nice if you could just construct a retaining wall, but that’s unfortunately not possible. Parts of the wall can sag due to soil settling too low, and weeds can grow into the wall.
If you pour a concrete retaining wall you’ll need to be on the lookout for cracks, also as that means the wall is likely about to fall apart entirely.
Related article: Why Does Concrete Crack? (There are actually multiple causes)
A retaining wall inspection can be done by a licensed professional if you’re unsure of what constitutes deterioration and damage. Catching problems before they become extensive is essential to the longevity of your wall.
Making the Wall Too Heavy
A wall that’s taller than 4-feet will need a building permit and an engineer’s assistance to put up.
Very tall retaining walls are too heavy and are typically outside of the skills of the average DIYer and have to meet strict building codes for safety’s sake.
The weight of the wall will necessitate anchors for extra support.
Conclusion
Building a retaining wall is very involved and labor-intensive. Knowing the specific reasons for making these walls helps build them as it allows you better understand the construction process.
You might need an engineer’s help to plan or build the retaining wall, as it may be a bigger job than you can handle. You may need a permit also, depending on the wall’s dimensions and its location.
It’s important to know what not to do when building and after completing the wall too. Don’t take on too much, do proper maintenance, and don’t weigh down the wall too much.