So, you’re planning on remodeling your backyard and adding a walkway — that’s great! Many people find a walkway useful, but walkway materials like brick and natural stone are not cheap and are often hard to install. Fortunately, there is a more affordable alternative, like a concrete walkway, which you can even build yourself if budget is concerned.
To make a concrete walkway, you need to plan carefully. You also need to use a few handy tools, protective gear, construction materials and products, and a concrete truck. You’ll save on renovation costs by doing the work yourself. Getting some help from friends and family would be helpful, too.
Throughout this article, you will also learn the following:
- Benefits of building a walkway
- Concrete walkway ideas
- How to maintain concrete walkways

Table of Contents
Why Build a Walkway
Having a walkway is terrific because you do not have to walk on grasses and soils and disrupt their condition in the long run. Besides keeping your grass and soil stable, a walkway also adds more personality to your home or business surroundings.
There are different walkways, some made out of wood, stone, or brick. If you’re on a budget, mulch and gravel are good options, but concrete walkways are also quite affordable.
These are a few reasons why you want to build a walkway:
- Inviting pathway: All walkways are unique, so whether they are made of expensive stones or simple gravels, your walkways will make you and your visitors feel happy walking on them. Having a walkway in your garden is nice, too. A walkway can also help you create your dream zen garden at the back of your house.
- Convenience: Your visitors can easily find the entrance to your building, and they won’t step on your grass or bring muddy shoes to your front door on rainy days. If you have flowers on your grass, you won’t risk stepping on them.
- Design: Adding a walkway to your landscape will transform how your home looks. You can use a specific walkway material or different walkway materials to create the aesthetic you want.
- Safety: If you live somewhere that rains or snows a lot, a walkway will be very useful as it will provide you and your visitors a safer and easier path to walk. Shoveling snow out of your walkway is a lot easier than shoveling snow out of an entire driveway.
- Increase in home resale value: A home with a beautiful walkway will stand out from the one that doesn’t. You will have better chances of selling your property at a better deal next time.
What You Need To Know/Do Before Building a Concrete Walkway
As discussed earlier, a concrete walkway will transform your property. Depending on what material you’ll be using, the cost of building a walkway may also vary on how much pavement you will be needing.
Related article: Cost of a Concrete Sidewalk: Complete guide with exact prices
The more pavements you need and the fancier the materials you use, the more the project will cost you.
While mulch and gravel walkways are excellent choices for affordable projects, concrete is a good option, too.
Many people use stones and bricks as borders for their concrete walkways — so can you — but first, you need to build your concrete walkway before everything else. Once you have completed your concrete walkway, you can always add cobblestones, bricks, or whatever other materials you want later.
It would always be best to hire professionals if you don’t know anything about construction. However, if you want to build the concrete walkway yourself, you should research some of the basics to give you a clearer idea of what to expect from this DIY project.
Learn how to use the tools needed for the project, take safety precautions, and use this guide along with other guides (if necessary) to help you along the way.
Plan Ahead
Before you start building, it’s essential to layout your construction plan. Decide where your walkway should be — maybe you want it to be at the back of your garden, at your building entrance, or your front yard.
Also, you want to consider the weather conditions in your area. Does it rain or snow a lot there? It will be challenging to work in severe weather conditions.
It’s essential to know your budget and determine how much your materials will cost. Hiring professionals to help you with the job can cost a lot, especially if you want your concrete walkway long or need different walkways for different house parts.
However, you can spend a few hundred dollars only if you make a concrete walkway yourself.
Get Your Construction Supplies
You need to determine the size of the concrete walkway you want to make to help you figure out how much supplies you will need for your DIY project.
Many of these supplies are available at your local building materials stores. Alternatively, you can get your construction supplies online via Amazon.
Here’s what you need for your concrete walkway:
- Tape measure
- Fiber-reinforced concrete
- Line level, such as the Johnson Level & Tool Aluminum Line Level
- Expansion joints, such as the Quikrete Concrete Expansion Joint Strips
- Claw hammer
- Wooden stakes
- Wood forms
- Shovel
- Trowel
- Wheelbarrow
- Concrete mixing tools
- Broom
- Marker pen or pencil
- Crowbar
Once you have all your equipment and materials ready, you can proceed with making a concrete walkway that leads to your front patio.
How to Make a Concrete Walkway Step by Step
If you like to see a video explaining and showing every step, you should keep reading, and you will find a great video further down this guide.
1. Use Stakes To Make Reference Points
Before you start making your concrete walkway, you must decide how big or long you want your walkway.
After taking your measurement, using a hammer, hit a stake into the ground to mark the point where you will begin your concrete walkway — this stake acts as your reference point for the rest of your concrete walkway project. Do this so you can join your walkway with your patio.
2. Tie a Line Level to Your Stakes
Once you have set up your first reference point, you want to take another stake and hammer it to the ground to make another point.
You want to attach a line level to it to ensure that the walkway gets leveled correct. Screw the top part of your first stake where you connect your line level.

If you’re wondering what a line level is, it is a long string strung through a small level, which you can slide along the string. Tie your level tightly to the second stake.
If you connect your walkway to your patio, ensure that water from the sidewalk will move away from your patio.
The bubble should not show “level.” Instead, you want to create a slight slope away from your patio. If you don’t do this, water may get washed on your patio and cause foundation problems in the future.
3. Measure Your Sidewalk
After sorting out the slope for your walkway, now it’s time to measure the width of your sidewalk using a tape measure.
Use your first reference point to help you estimate the width of your sidewalk. Hammer down a stake into the ground to mark the width of your sidewalk.
You will place a stake into the ground every three feet (91.4 cm) down until the end of the sidewalk.
Once all your stakes are in the ground, use a level to mark your stakes to know how far down you should dig to create your form before pouring in your concrete.
Pay attention to your string — you don’t want the level to push down the string because this will throw off your sidewalk’s angle.
Rest the level gently on the string. Check your bubble because you do not want it to be in the center; you want the water to move away from the house. When the bubble is slightly off, using a marker pen or a pencil, make your mark on the stake.
4. Dig Your Soil
You might want to use an electric shovel to help you speed up your digging. Dig the soil carefully; it’s okay to go slow as this is your first time doing it.
You only want to dig enough soil—about 3″ (7.62 cm) deep—for the area you want to walk.
Also Read: Concrete Thickness for Sidewalks: Selecting the perfect thickness
5. Attach Your Form to Your Stake
Once you have dug out the area you want to walk, place an expansion board on-level with your string.
Expansion joints will be placed about three feet (91.4 cm) from each other. The boards will prevent your concrete from cracking during expansion and contraction during hot and cold temperatures.
Then, you want to take your level and make sure that your form is where it has to be. Again, you want to create a slope on your sidewalk to ensure water will move away from the house.
Once again, mark your stake. Then, attach your form to the stake. Screw the form to the stake using a screwdriver.
You may want to add more stakes to give the rest of your stakes and expansion boards extra support. Adding additional stakes will prevent the concrete from affecting your form and give you an uneven edge.
You want to hammer down your stake correctly into the ground to ensure that it is stable.
6. Prepare Your Concrete
Use fiber-reinforced concrete to create your concrete walkway. Once hardened, the fiber-reinforced concrete will give your walkway extra strength.
There is no need to use wire mesh or metal rebar for concrete support, thus saving you more construction time.
We recommend using Quikrete, which has special tiny fibers that will strengthen your concrete. All you need to do is use a concrete mixing tool to mix it with water and pour it on the dirt in your wheelbarrow. With the fiber-reinforced concrete, your concrete walkway will serve you for a more extended period.
Read more: Best Concrete Mix for Sidewalks: What the pros use
Here are some safety tips on working with concrete:
- Always keep your skin and clothing protected when handling concrete, as the material can cause chemical burns.
- Wear protective clothing, glasses, and boots on-site.
- If your skin gets into contact with the concrete, rinse with water immediately.
- You must rinse your eyes with water and seek immediate medical assistance if they get into contact with concrete.
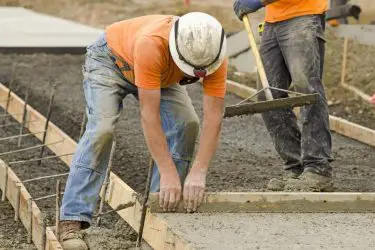
7. Pour Your Concrete Mixture Into Your Walkway Area
Pour the mixture into the area you have dug earlier. Use 2×4 wood to help you even out the concrete over the whole area.
Put the 2×4 on the forms and push it back and forth until you reach the end. By now, your concrete should look much smoother.
After that, you need to smooth out the surface using a trowel.
Use a concrete finishing tool to give your concrete an excellent finish.
8. Spread Your Concrete Evenly
The concrete finishing tool ensures that your concrete walkway is separated from the forms. That way, once your concrete walkway is dry, you will not damage it when you remove the forms. Use a trowel to give your concrete walkway one final finish.
A very smooth concrete walkway may look pretty when it is dry, but it can be slippery under pouring rain. The last thing you want is to slip while walking on your walkway when the surface is wet.
You can use a broom to solve this problem.
9. Broom Your Concrete
After finishing your concrete walkway with a trowel, use a broom to brush the wet concrete’s surface from side to side.
You want to do this to create a less slippery concrete walkway. Do not press the broom too hard on the surface; do it gently.
10. Let the Concrete Dry
After completing the final touch of the wet concrete, clean up your tools as soon as possible. You must not delay cleaning because once the concrete is dry, it’ll become challenging and nearly impossible to remove.
After brooming your wet concrete, you want to wait for your concrete walkway to dry. Let it cure for about a week until it is hard enough.
11. Remove the Forms
Once your concrete walkway is nice and hard, you want to remove the forms, which is easy to do. All you need is a crowbar and a claw hammer.
To remove the forms, put the crowbar between the forms and the sidewalk and hit the crowbar’s top using the hammer.
By hitting the hammer, you are loosening the form. Use the crowbar to pull the forms away from the walkway side in a back and forth motion. Once the form is loose, rip it off using your hand.
Here’s a great video showing you how every step would look like:
Here’s another great video giving you some good tips:
Tips on Building a Concrete Walkway
Proper planning is vital to the success of your DIY project. You will be spending a lot of time outside working on your concrete walkway. The bigger or longer the concrete walkway is, the more labor-intensive the work will be.
Here are several tips for your DIY concrete walkway project:
- Always check the weather. You don’t want to ignore the weather forecast because even a little rain can disrupt a freshly made concrete walkway. A very dry and hot day wouldn’t be good either as it can cause the concrete to set faster than you can finish it.
- Order enough concrete. As a beginner, you want to avoid not having enough concrete for your project. If you have leftovers, you can always use them for other different future projects.
- Always have everything you need before starting your project. You don’t want to start looking for your tools in the middle of pouring. Make sure you have all your tools ready before your start pouring your concrete.
- Use a reliable wheelbarrow. Depending on your concrete walkway size, you want to have a wheelbarrow that is sturdy enough to accommodate the concrete you will be using. You can always borrow a heavy-duty wheelbarrow from friends or rent one from rental shops.
- Don’t be shy to ask for help. It would be helpful to have your friends and families help you with your project. In return, you can help them with theirs in the future.
- Avoid using water while troweling. Getting a smooth surface is not always easy, but you should not sprinkle a little water on your wet concrete. Water will only weaken the body and cause flaking in the future.
- Don’t tear up the forms too soon. Wait a couple of days until the concrete hardens before removing the forms. Removing the forms too early can cause your concrete sidewalk edges to break.
- Always put safety first. You don’t want the concrete to get on your skin. While some people can tolerate hours of skin contact with concrete, many may find prolonged exposure to concrete will cause their skin to feel burnt.
- Leave your signature on your concrete. You will want to remember your first DIY construction walkway project, so why not scribble your name or initials on the concrete before it gets hardened? You have something to smile at every time you walk on the concrete walkway.
Concrete Walkway Ideas
Have you been to someone’s house and been impressed by their concrete walkways? Beautiful, creative walkways make a house’s outdoor space look elegant and organized and inviting to both the home residents and their visitors.
Concrete walkways are becoming more popular today and are often accompanied by other walkway materials like stones and bricks.
Concrete is excellent for walkways because it is versatile. You can use concrete in different environments, be it in lush green suburbia or even in the desert. The sky’s the limit when designing your outdoor space concrete walkway.
Straight Concrete Walkway
If you prefer a traditional and straightforward design for your walkway, you can always go with a straight design. A straight design will give your visitors a formal entry that leads them straight to your door.
You can make a gap between every big square concrete that leads to your front door, even a piano-shaped walkway if your building is a music school.
For the piano walkway design, you want to use black concrete to form shapes that resemble a piano’s black keys. If you’re going to keep the design simple, you can always make a straight long concrete walkway, no gaps needed.
If you like, you can line your concrete walkway with bricks or stones.
The straight concrete walkway design is best suited for minimalistic modern houses. This type of walkway is elegant, simple, and formal. Adding plants and flowers along the walkway would be nice.
Curved Concrete Walkway
If you prefer a walkway that looks a little less formal than a straight one, then you should opt for a curved one instead. Curved concrete walkways are better suited for homes with big outdoor spaces, like countryside homes.
The reason is that a curved concrete walkway will take visitors for a short walk outside to admire the surrounding beauty.
You want to have beautiful flowers, plants, or trees when choosing this walkway type. Perhaps line up some lavenders along the walkway. Flowers like lavenders and lilyturf will make your concrete walkway look grand and elegant.
While straight concrete walkways may look formal and sophisticated, curved walkways offer a more elegant and polished personality than straight ones.
Curved concrete walkways are excellent if you have beautiful plants or outdoor decorations to highlight. You can use landscape lighting to enhance the curves even more.
Stamped Concrete Walkway
For those who want to create a natural stone or pavers look for their concrete walkway, the stamped concrete walkway is a great choice.
This type of walkway is curved and stained to highlight its stone veneer. Stamped concrete walkways’ stain color is a typically warm brown tone, highlighting its design while leading visitors straight to the front door.
Colored Concrete Walkway
You can transform your concrete walkway using any color you like using concrete staining and dying products. This type of concrete walkway uses brown tones and sometimes with dark gray tones for the borders.
Since the brown tones stand out better than dull gray, your walkway becomes more inviting, and the colors are well-balanced with both your home and the landscape.
Concrete Walkway With Decorative Borders
Adding a border to your concrete walkway can make a lot of difference to its overall appearance. Many people use bricks as borders for their concrete walkways to achieve a rustic feel.
Alternatively, you can also use other materials for your concrete walkway borders, such as stone, wood, or flagstone.
How To Maintain a Concrete Walkway
After all that hard work, your new concrete walkway deserves to be taken care of properly. You want to maintain your concrete walkway so it can serve you longer in the years to come.
A beautiful and tidy concrete walkway will enhance your landscape and prevent regular touch-ups.
Here are some tips on how to care for your concrete walkway:
- Sweep your concrete walkway once every few days or once a week if you only have the weekends to do it. You want to sweep more often during fall as there will be many fallen leaves on your walkway. When these leaves get wet, they can stain your walkway.
- Give your concrete walkway a good clean twice a year. You want to wash your walkway using eco-friendly cleaners to remove mold and mildew so you won’t harm your lawn. Scrub your walkway surface using a stiff bristle brush to remove stains from fallen leaves.
- Trim your plants whenever you can to prevent them from growing over your concrete walkway. You don’t want your plants or trees to avoid sunlight, so you should always prune your trees. By trimming your plants, you are slowing down their growth, hence less maintenance.
- Fix cracked concrete the minute you notice it. You can get your fixing supplies from your local building supply centers.
- Avoid using a power washer for cleaning. Power washers can accelerate the concrete walkway’s wear and tear process. If you have to use a power washer, you must avoid using it on cracked concrete surfaces or edges.
- Protect your concrete walkway using concrete sealers. There are water-based and solvent-based sealers. Concrete sealers will protect your walkway from moisture and make it easier to clean.
The great thing about concrete is that it is a very durable and easy-to-maintain product. Even so, you must maintain your concrete walkway to extend its lifespan.
Wear and tear are normal in every concrete walkway’s life, but you can slow down the process by repairing the small cracks you find on the walkway as soon as you notice them.
If you do not fix small cracks, they can become worse in time. The fissure caused by once little damage can lead to more severe problems, such as water intrusions.
If you cannot fix the problem yourself next time (maybe you are busier by then), you may have to leave the job to the professionals, which will cost money.
Of course, if you do not have much time in the future to fix your concrete walkway, you should consider calling for professionals. By taking care of your concrete walkway properly, you can avoid regular fixes. You also don’t want to start all over again, building a concrete walkway from scratch again.
Final Thoughts
It’s not impossible to make a concrete walkway on your own. By doing it yourself, you’ll save yourself money on hiring professionals. However, it won’t hurt to hire professionals to help you create a more creative and more difficult concrete walkway design if the cost is not a concern.
Before starting your DIY project, you must plan your project properly and have everything you need ready. If you can, invite some friends and families to help out. Once your walkway is finished, you must maintain your walkway by keeping it clean or fix it whenever necessary.


