A house’s frame is the essential piece that holds the whole thing together. For many DIY enthusiasts, building a wall frame already seems like a daunting task, and building the frame onto concrete may seem outright impossible.
To build a wall frame on concrete, figure out where you want the wall. To make sure the wall is built to proper specifications, you need to measure the wood and the height of the room. Concrete basement walls need waterproofing before a wood frame can be built over them to prevent molding.
In this article, we’ll look into why frames are so crucial to your home’s structural integrity and layout. We’ll also take a step-by-step look at how to build a non-load-bearing wall on concrete flooring and basement walls. The final thing we will cover is three different ways to attach wood to concrete.
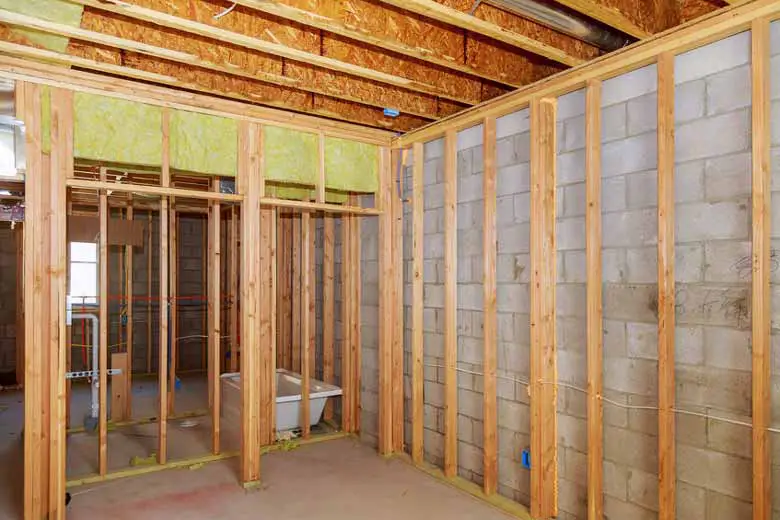
Table of Contents
The Importance of Frames
A frame is a lot like a human skeleton. It’s the foundation that the rest of the house is built over and helps hold it all together. A frame is the part of the construction that bears the load of everything from the roofing to the foundation.
Without a properly built, sturdy framing, buildings would be unable to hold their weight and collapse onto themselves. The first thing that you need to do when building a house frame is to outline its placement.
A well-planned frame will specify each board’s location and brace down to the exact inch. The shape of the frame’s plan will ultimately dictate the form of the finished structure.
Less severe purpose frames serve to help create new areas within structures. Non-load-bearing frames are built to mark off the dimensions of rooms within buildings and homes. In the case of renovation projects, wall frames can make entirely new spaces, revitalize a room, and completely rearrange a place’s layout.
You don’t have to live in the same house for the entire time you’re living in it. If you want to change things up a bit, consider adding a new wall. You can make a new office or separate your dining room and kitchen. Whatever you decide to do, the following instructions will help you realize your goal.
Before beginning any construction project, always wear proper PPE. Safety boots, gloves, goggles, masks, and hearing protection are imperative protection for this project.
1. Gather the Tools Needed
Here are the tools you will need:
- Table, hand, or circular saw
- Untreated 2×4 lumber
- Treated 2×4 lumber
- Carpenter’s square
- Chalk line
- Tape measure
- Carpenter’s pencil
- Construction adhesive
- Level
- Shims
- Hammer
- 16d nails
- Powder-actuated nail gun
2. Figure Out Where the New Wall Is Going
You can put a wall anywhere in your home that can accommodate it. You will need to select an already existing wall that’s got a stud in the exact spot you’re going to put the new wall. For example, if you have a long wall with a stud in the middle, the new wall would attach to the pre-existing one at that middle stud at a 90-degree angle.
Now that you’ve found a stud, you’re going to check for a joist in the ceiling to attach the top of the new wall’s frame. The wall will need to be positioned slightly closer to a joist if there isn’t one above the new wall’s location.
Blocking will need to be installed between the existing wall’s studs if you’re dead set on where you want the new wall. If you didn’t know, blocking essentially serves as makeshift reinforcement—wooden 2×4 blocks cut to connect the distance between studs. Blocking will need to be placed between joists parallel to the new dividing wall, too.
The final part of the first step is to mark the wall’s measurements and position once you decide on them.
3. Cut the Plates
Plates are the two beams that run across the top and bottom of a frame. A wall frame’s beams are run between these two horizontally laying pieces of wood.
The top plate will be made of regular lumber, and the bottom one will be cut from treated lumber.
To make the plates, take two 2×4 pieces of the previously specified woods and cut them 3 ¼ to 3 ½ inches (8.26 to 8.89 cm) longer than the desired length of your wall. The studs and sheathing will take up a lot of space on the plate, so the extra inches make up for that.
4. Measure the Studs
After you’ve cut the plates, line them beside each other, with the ends touching and the broadest facing upward. You’ll take your tape measure and carpenter’s square to mark each stud’s placement to the plates simultaneously.
Your first line will be marked at 1 ½ inch (3.81 cm) with an “X” drawn in the middle of it and the edge of the plate to show where the stud goes. Your next line will be drawn at 3 inches (7.62 cm), and the next at 18 ¼ inches (46.36 cm), with each following a line marked every 16 inches (40.64 cm). You’ll need to draw an “X” on the right of each measurement line.
The final two lines need to be marked as followed: 3 inches (7.62 cm) from the plate’s end and 1 ½ inch (3.81 cm) away. Don’t worry about the length between these stud placements and the other regularly placed ones. The space between these final two studs lets you add blocking, making the wall corner stronger and aids with sheathing.
5. Measure From Ceiling to Floor
The fourth step requires measuring (in at least three different spots) from ceiling to floor along where your new wall is going. You will need to subtract 3 ½ inches (8.89 cm) to account for each plate which is both 1 ½-inch (3.81-cm) thick.
The subtracted 3 ¼ inches (8.26 cm) will help you measure the proper stud length and give you some clearance when putting up the wall frame.
6. Cut and Attach the Studs
You’ll need to cut a stud for each measurement mark you made on the plates, then turn them sideways so the broadside is facing vertically. The first stud should be attached with two nails (broadside facing vertically) to one plate from the stud’s end, using the drawn measurements as guides.
The process of nailing each stud down will need to be complete with the second plate and again with the other loose studs.
7. Lift the Wall Frame
This step is where you lift the wall frame into place. Generously apply moisture-resistant construction glue to the bottom plate’s underside and top of the top plate. The adhesive will help keep the frame in place while you finish attaching it to the cement flooring.
To position the frame, lift it and walk forward. You will gradually reach lower and lower on the frame until it’s standing. The bottom plate should be lying flat against the concrete. Moisture can get into any openings and cause the wood to rot.
8. Make Sure Everything Is Plumbed and Add Shims
Your wall should be maneuvered until it’s placed exactly where the location guide marks are. The wall should be plumbed (straight up and down). Use your level to make sure everything is even. If it isn’t, you can move the frame and add shims between joists until it fits perfectly.
9. Cut the Required Parts and Add Blocking
Five pieces of 12-inch (30.5-cm) 2×4 wood can serve as the blocking for your wall frame. After you’ve cut the required parts, add construction adhesive and insert them between the studs. Don’t be surprised if they don’t fit perfectly without a bit of hammering.
10. Secure the Frame to the Cement Floor
The ninth and final step is to attach the wall frame to the floor. While it might seem impossible to drive a nail through cement, it’s not a difficult task at all. A powder-actuated nail gun is all you’ll need to punch through the wood and cement.
Secure the wooden frame to the floor with two nails every 10 to 12 inches (25.4 to 30.5 cm) and attach the top plate the same way (or wherever there’s a joist). Afterward, the wall frame is ready to be insulated and sheathed.
Related article: Do Concrete Blocks Provide Insulation?
How To Attach a Wood Frame to Concrete Basement Walls
Putting wooden frames on concrete basement walls is an entirely different beast from installing a non-load-bearing wall in your living room or kitchen. You’ve got to keep moisture and mold out of your basement, too.
1. Gather the Tools Needed
Here are the tools you will need:
- Level
- Waterproof roll-on seal
- Extruded polystyrene board
- Chalk line
- Tape measure
- Carpenter’s pencil
- Construction adhesive
- Table, hand, or circular saw
- Untreated 2×4 lumber
- Treated 2×4 lumber
- Shims
- Hammer
- 16d nails
- Powder-actuated nail gun
2. Waterproof Your Walls
Basements are water magnets. Moisture seeps in from the ground through the concrete and can lead to mildew, mold, and water damage. Apply a roll-on waterproof seal to somewhat alleviate the problem.
It’s not the perfect solution—water can still make its way into your basement—but it’s better than nothing. If your walls are damp before application, dry them with a humidifier.
3. Put Up Foam Board
The next thing you’ve got to do is install some extruded polystyrene (XPS) foam onto the walls. Wait until the waterproofing has dried, and glue the XPS foam to the wall with construction adhesive made for foam.
Begin applying the adhesive vertically from the top to the bottom of the wall in a continuous line. The horizontal application may result in water pooling in the glue’s crevices as it dries; vertical application keeps the condensation from seeping behind the concrete walls. You can add a caulk seal on the bottom of the foam for more moisture-proofing.
4. Add Joist Blocking
Blocking will need to be added to any floor joists parallel to the wall being built. You can screw spare wood on one side of the wood and screw the other side to the bottom plate. Only use excess wood if the blocking isn’t touching the concrete. If the brace does come into contact with concrete, use waterproof treated lumber.
5. Measure the Wall Frame
The wall frame won’t fit flush against the foam but should instead be a few inches away from it. It would help if you had at least a ½ inch (1.27 cm) between the lower plate and XPS foam. Marking a line 4 inches (10.16 cm) away from the bottom plate will help you accomplish this.
You should also measure from ceiling to floor and subtract 3 ½ inches (8.89 cm)—1 ½ inch (3.81 cm) for both plates—so that you can measure the length of the wall studs.
6. Build the Wall Frame
Step five for basement walls is much the same as steps three and five for non-load-bearing walls. Like in the third step of building a non-load-bearing wall, you can hold the plates flush against each other and mark off stud placements.
The first stud will be at 1 ½ inch (3.81 cm), the second at 3 inches (7.62 cm), the third at 18 ¼ inches (46.36 cm), and every stud after will be 16 inches (40.64 cm) apart. Every measurement will have an “X” to denote where the stud goes. The final two studs will be 3 inches (7.62 cm), then 1 ½ inch (3.81 cm) away from the end of the plate.
You can attach the studs using the same method as in the previous step five. Attach the studs at each measurement made with two nails to both plates.
See the “Measure the Studs” and “Cut and Attach the Stubs” sections for reference.
7. Raise the Wall
This step is where you apply moisture-proof adhesive to the top and underside of the upper and lower plates, lift it, and walk forward. The lower you reach on the framing, the higher it’ll go until it’s standing. You can take the time to check that everything is plumbed. If not, adjust and add shims until the frame is straight.
8. Secure the Plates
The bottom plate can be secured to the floor with a powder-actuated nail gun with two nails every 10 to 12 inches (25.4 to 30.48 cm). Secure the top plate to every joist with the nail gun. Check if the ceiling is plumbed every 4 feet (1.22 m), and if it’s not, add shims every three joists.
Alternative Ways To Attach a Wall Frame To Concrete
Trying to hammer a nail through cement is about the same as punching it. You’re not going to make any progress and are liable to hurt yourself. Powder-actuated tools are the perfect way around this because they can break through cement. A powder-actuated nail gun could bust through the rigid material—no problem.
What if you didn’t have a powder-actuated nail gun? Could you still fasten a wall frame to cement? There are many ways to secure a wall frame to concrete. A powder-actuated gun is just one method you can choose. Below is a list of 3 other ways to attach wooden frames to concrete.
Popular article: Are Insulated Concrete Forms Worth It? 6 Important Facts
Use Concrete Nails
This method only works if the concrete is under a year old, as relatively fresh concrete is possibly “soft” enough to drive concrete nails into. All concrete nails aren’t made the same, however. Some have a cut nail design, and others have a tapering V-shape, reminiscent of railroad stakes. Pick a nail at least an inch (2.54 cm) long so that your attachments can hold.
Use Masonry Screws
A surprisingly simple solution to attaching a frame to concrete is masonry screws. You will need a special bit to drill a pilot hole that matches your drill’s fastener, but the screws will work.
You’re going to have to drill ¼ inch (6.35 mm) deeper than the embedment on the drilling fastener and suck the dust out the hole with a shop vac before securing the screw. The hex-head equally distributes pressure, so the wood isn’t damaged.
Here’s a guide on how to drill into concrete and what tools you need.
Use Lag Shields
Lag shields are screw-type anchoring devices used in conjunction with lag bolts which are very sturdy fastening bolts. Installing them takes a bit more work than other options on this list, though. You have to move the bottom to drill into the floor.
After you’ve drilled your holes, you’ve got to suck out the dust and tap the shield down into position. The next thing you have to do is put the bottom plate back into place and insert the lag screws with washers in the lag shields.
Conclusion
A building’s frame is an essential part of its construction. Wall frames shake up your home’s design and create a new space for you to enjoy. It’s like adding a fresh coat of paint to spice up your home. People can add wall frames to concrete floors and concrete basement walls to accomplish this transformation.
Typically, concrete is too hard to be punctured, but with the right tools, like masonry screws and hardened concrete nails, it is doable. It can be hard work, but a skilled enough DIYer can pull it off if they’re willing to apply enough elbow grease.