Setting fence posts in concrete is the best way to stabilize them and prevent them from becoming slanted and crooked. However, in the unfortunate event that your fence post becomes broken, having it set in concrete can make it very difficult to remove. So, how do you remove a broken fence post that is set in concrete?
To remove a broken fence post set in concrete, first, dig the concrete block out with a shovel. Next, lay a long piece of 4×4 over the hole and wrap a ratchet strap around it and around the sides of the block. Lastly, lift one side of the 4×4 to leverage the concrete block out of the hole.
In this article, I will discuss the step-by-step process of removing a broken fence post set in concrete, as well as the tools and equipment you will need for the job and the things to avoid doing. I’ll also provide some advice on setting a new fence post in concrete, where the materials can be purchased, and the safety precautions to keep in mind while working. To learn all of this, keep reading!

Table of Contents
Removing a Broken Fence Post Set in Concrete: The Basics
When setting fence posts in the ground, it is common practice to cement them in at the base. Doing this has a few benefits:
- It stabilizes the fence by adding weight to the bottom and making it heavier.
- It locks the fence into the ground.
- It keeps the fence straight.
Without cementing the posts into the ground, your fence will lack stability, and as it settles and the dirt shifts over time, it will become twisted and compromised.
As a general rule, roughly ⅓ – ½ of the post should be under the ground. This means that for a 5-foot tall fence, you would want around 1.5 – 2.5 feet of fence post length under the ground. The deeper the fence post is in the ground, the more stable the above-ground portion will be.
If the fence post is not buried deep enough in the ground, it will be weak and unstable.
Sometimes, fence posts can break due to age and wear or due to an external force that is sufficiently powerful enough to snap them. Many different events can lead to broken fence posts, but the end result is always the same.
A broken fence post that is cemented into the ground can be very difficult to remove if the proper steps are not taken because there is not much to hold onto for leverage, and the concrete blocks are extremely heavy.
The closer to the concrete block the fence post has broken, the more difficult it is to remove. Oftentimes, the fence post has broken off right where it emerges from the concrete. This can be a tough situation to deal with… but where there’s a will, there’s a way.
While it can help to have a friend, neighbor, or relative help you remove your broken fence post, it is possible to remove it without any assistance. The steps outlined in this article assume that you are removing the post on your own.
If you don’t have experience working with fences, don’t worry; as long as you’ve got a baseline of physical fitness, you can do this.
If you perform the steps outlined in this article’s following section, removing your broken fence post should be little trouble and can be done relatively easily.
Required Tools and Equipment
Before we walk you through the process of removing your broken fence post from the ground, it is necessary to first catalog all the tools and equipment necessary to properly perform the job.
Always equip yourself with the appropriate tools and never attempt to improve, cut corners, or improvise. Doing the job properly will ensure a safe and satisfactory result.
The tools you will need to remove a broken fence post cemented in concrete are:
- Shovel
- Ratchet strap
- 4” x 4” x 6’ wooden board
- A small sheet of plywood, particleboard, or any hard flat surface
- A hi-lift jack (optional)
Each of these bullet points has attached to them a link to where the necessary tool can be purchased at a reasonable price and a high-quality guarantee.
Steps to Removing a Broken Fence Post Set in Concrete
Now that you have assembled all of the necessary tools for removing our broken fence post’s concrete block from the ground, you may begin setting everything up for the removal.
Keep in mind that the main focus of removing a broken fence post is centered around the principle and use of creating optimal leverage to overcome the weight and awkward angle of the object.
With the use of levers and advantageous mechanics, even one person can easily lift a very heavy weight on their own, regardless of their level of physical strength.
You should not have to struggle and strain your body to remove the broken fence post. If you find yourself over-exerting yourself to remove the post from the ground, something is wrong, and you should stop immediately and reassess the situation. When done properly, using a scientific approach, a very minimal physical effort will be required.
Follow these steps to remove a broken fence post set in concrete:
- Dig a trench around the concrete fence post. Use your shovel to dig around the entire perimeter of the concrete block to expose as much of it as possible. The shape of the concrete block may vary, but the steps will remain the same.
- Lay a 4”x4” wooden plank flat across the hole. The vast majority of its length should be on one side of the hole.
- Lay a plywood sheet underneath the 4×4 (on the shorter side). This will prevent your 4×4 from digging in and sinking into the dirt as you begin to pry the block out of the ground with it.
- Wrap a ratchet strap around the concrete block.
- Loop the ratchet strap around the wooden plank.
- Tighten the strap to secure the block to the wood. Use the crank until the strap cannot be tightened any further and no slack is remaining. It is critical that you set the strap up tightly and securely. Otherwise, the strap may slip or pop off when you begin lifting.
- Position yourself at the long end of the 4×4.
- Lift the long end of the wooden plank upwards. Pick up the long end of the 4×4 and begin to drive it upwards to lift the concrete block out of the hole. Before you begin lifting, take a deep breath into your lungs and brace your core muscles. Lift with your legs and hips by holding onto the 4×4 and pushing the ground away from you. Keep your back straight and stay tight throughout your entire body.
- The broken fence post can now be taken away. Once you have gotten the concrete block out of the hole, it’s time to remove it from the site.
If the concrete block does not want to lift out of the dirt despite your best attempts to pry it up, do not fear. There is another way that requires minimal effort and is guaranteed to work.
You may not always be able to lift the broken fence post out of the ground with brute strength as, depending on the type of mud, the size of the concrete block, the position of the post, etc., it may be stubborn and refuse to come out.

If this is the case, simply situate a hi-lift jack underneath the long end of the 4×4 and begin to jack it up. A jack can lift more weight than any human body ever could and with very minimal effort. Take advantage of this.
This entire process should not take long to perform if you are already prepared with the right equipment.
The above method can be used to remove multiple broken fence posts in relatively short order.
Safety Precautions: What Not To Do
Now that we have outlined how to properly remove a broken fence post set in concrete safely and securely, it is necessary to quickly go over the main things to avoid while trying to perform the task.
Earlier in this article, we alluded to the fact that you should never, under any circumstances, use makeshift materials or compromised tools when performing this job. However, we feel it is important to reiterate this point with a little more elaboration on why this is the case.
When you begin to apply pressure to your lever, it, as well as your own body, will be under a lot of tension and pressure.
Say you were to use a rotten piece of wood for a lever or a shotty and worn-out ratchet strap, and it were to snap or slip as you began to lift; the effects of this happening would be extremely unpredictable. It could result in a fall, a blunt impact, a torn muscle, or any other injury that you can imagine.
If you are unsure about the strength or integrity of your equipment, do not use it.
Lastly, do not attempt to pull a broken fence post set in concrete out of the ground with your bare hands, i.e., without a lever.
The concrete’s weight, combined with the extremely awkward position, poses too great a risk of an injury occurring.
Do not be lazy or egotistical by trying to pull it out on your own. Work smarter, not harder.
How To Set a New Fencepost in Concrete
There are two reasons a person will typically remove a broken fence post set in concrete: to get rid of the fence entirely and leave it absent, and to replace the broken post with a new one.
If you are simply looking to pull the broken fence post out and leave it, then you will not need to read this section. However, if you have successfully removed the post and are now looking to replace it with a new one, you may be wondering how this is done.
We will now provide you with a quick instructional guide on how to set a new fence post in concrete.
Seeing as you already have your hole dug (you can reuse the same hole that you just removed your old post from), all that there is left to do is stand up your post and set it in concrete.
While this sounds easy enough, the most difficult challenge of the task is to make sure your post is level and straight when the concrete sets.
If your fence post ends up crooked when the concrete is finished setting, it will compromise your entire fence’s structural integrity and may need to be removed and redone.
Concrete in a fence post hole takes roughly 20 to 40 minutes to set, depending on the type of concrete you are using.
Related article: Concrete Fence Post Drying Times
Follow these steps to set a fence post in the ground with concrete:
- Fill the bottom of the fence post hole with gravel. Use roughly 6 inches of gravel to prevent the hole from becoming water-filled.
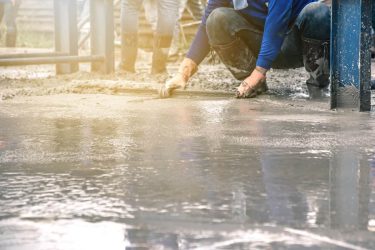
- Mix the concrete to a medium consistency. Use a mixing bag, a tray, or a wheelbarrow to mix your concrete until it is a nice consistency. Concrete should not be too gritty but not too watery.
- Place the fence post into the center of the hole. Be sure to hold it in place.
- Pour the concrete into the hole. You should fill the hole until it is nearly flush with the ground level. It is recommended that you use a fast-setting concrete or one that is specifically intended for setting fence posts.
- Make the post level by using a fence post level. Attach your fence post level to the post and begin maneuvering and adjusting it until it is situated in a perfectly level position. Ensure it stays level until the concrete is sufficiently hardened enough to hold it in place without your assistance.
- Let the concrete dry overnight.
- Bury the base by surrounding it with a layer of dirt.
Concrete gets harder and more stable the longer it sits. Although it may look set after a few hours, it still has a lot of hardening to do. Never become impatient when working with concrete and attempt to rush or speed up the job. It will always take a few days before the concrete settles into its final formation. All experienced concrete workers understand that concrete requires patience if it is to be done right.
Do you want to speed up the process you can actually skip the concrete mixing part of it. Read our article “How To Set a Post in Concrete Without Mixing” to find out how it works.

If you require a reliable fence post level, the Swanson Tool Magnetic Post Level is inexpensive, durable, and reliable. It will get the job done with no issue.
Never attempt to eyeball or freehand your fence post when determining if it is level. It will not be level, and over time the problem will worsen and become increasingly accentuated.
Where To Buy Quality Fence Posts and Construction Materials
Different fence posts are made of different materials, and the most common of these are wood and steel. Regardless of whether you are dealing with a wood or a steel fence post, the process of removing or setting it will be identical.
Related article: Concrete vs Wooden Fence Post: Is concrete worth the trouble?
Furthermore, concrete comes in many different forms, all with slightly different situational purposes.
Quikrete Fence N’ Post is the best product on the market for setting new fence posts and is available in almost all major retail hardware stores. While any type of concrete will work in theory, it is better to go with this product as you will undoubtedly find it easier to deal with.
Fence posts can be found and purchased in the lumber department of your local hardware store.
Pressure-treated wood is highly recommended for constructing fence posts. It tends to be more durable and weather tolerant than other options such as pine, but again, this will largely depend on the builder’s preference.
If you are interested in purchasing concrete online to set your new fence posts, 50-pound bags can be purchased Home Depot at a very low price.
Related article: How Many Bags of Concrete for a Fence Post?
One of the greatest advantages of building a fence from wood instead of metal is that there are nearly limitless unique design options that you can implement during the construction process. There are traditional picket fences, lattice top fences, criss-cross fences, and many others.
For a list of 24 different wooden fence DIY design ideas, see this article from HomeBNC.com. You will surely be amazed by the number of ideas they have come up with, and it will likely get your creative juices flowing.
Never be afraid to think outside the box and try your hand at some alternative designs.
Summary
In this article, we wanted to provide an easy step-by-step guide for removing a broken fence post that has been set in concrete.
To remove a broken fence post that is set in concrete, you must first dig up the block as much as possible.
From there, you will be able to wrap a ratchet strap around the concrete block and secure it to a wooden plank, which will lie across the open hole.
Now you are in a good position to lift up the plank and leverage the concrete block out of the hole with ease.